I blame my perfectly-curated-for-me TikTok feed for giving the impression that all AI tools, including ChatGPT, should instantly understand what I need with barely any input from me. They won’t.
ChatGPT can do a lot: run multi-step tasks, analyze complex datasets, generate fully-polished content, improve your entire customer experience lifecycle—the list goes on.
But even with its massive training corpus and internet access, ChatGPT can’t accurately answer questions about your organization’s internal processes, your product’s nuances, or your unique customer data unless you provide it. Those gaps matter, especially when you’re trying to build AI-powered experiences that feel genuinely personalized and deeply knowledgeable.
The good news is that you can fill in these gaps. Here are two ways to train ChatGPT on your own data. Plus, a few other solutions for creating your own custom chatbot.
Table of contents:
When I say “train” here, I mean giving ChatGPT extra context with your prompt or knowledge sources so that it can consider your information when responding back. This is separate from another type of advanced AI training—and a different discussion altogether—called “model training,” where information is incorporated into the model itself.
How to train ChatGPT on your own data
By training ChatGPT on your own data, you can transform it from a general-purpose assistant into a highly specialized expert. Here are two ways to set this up.
How to use ChatGPT custom instructions
Custom instructions (available on free and paid plans) allow you to feed ChatGPT background information and specify how you’d like it to format its responses. For example, let’s say you’re a customer support agent who uses ChatGPT to draft consistent, on-brand replies to customer queries. You can tell ChatGPT your role, the types of customers you support, and your company’s communication standards. From there, you can instruct it to always respond in a way that aligns with your organization’s brand.
Here’s a quick overview of how to add custom instructions to ChatGPT.
-
With ChatGPT open, click your profile.
-
Click Personalization.
-
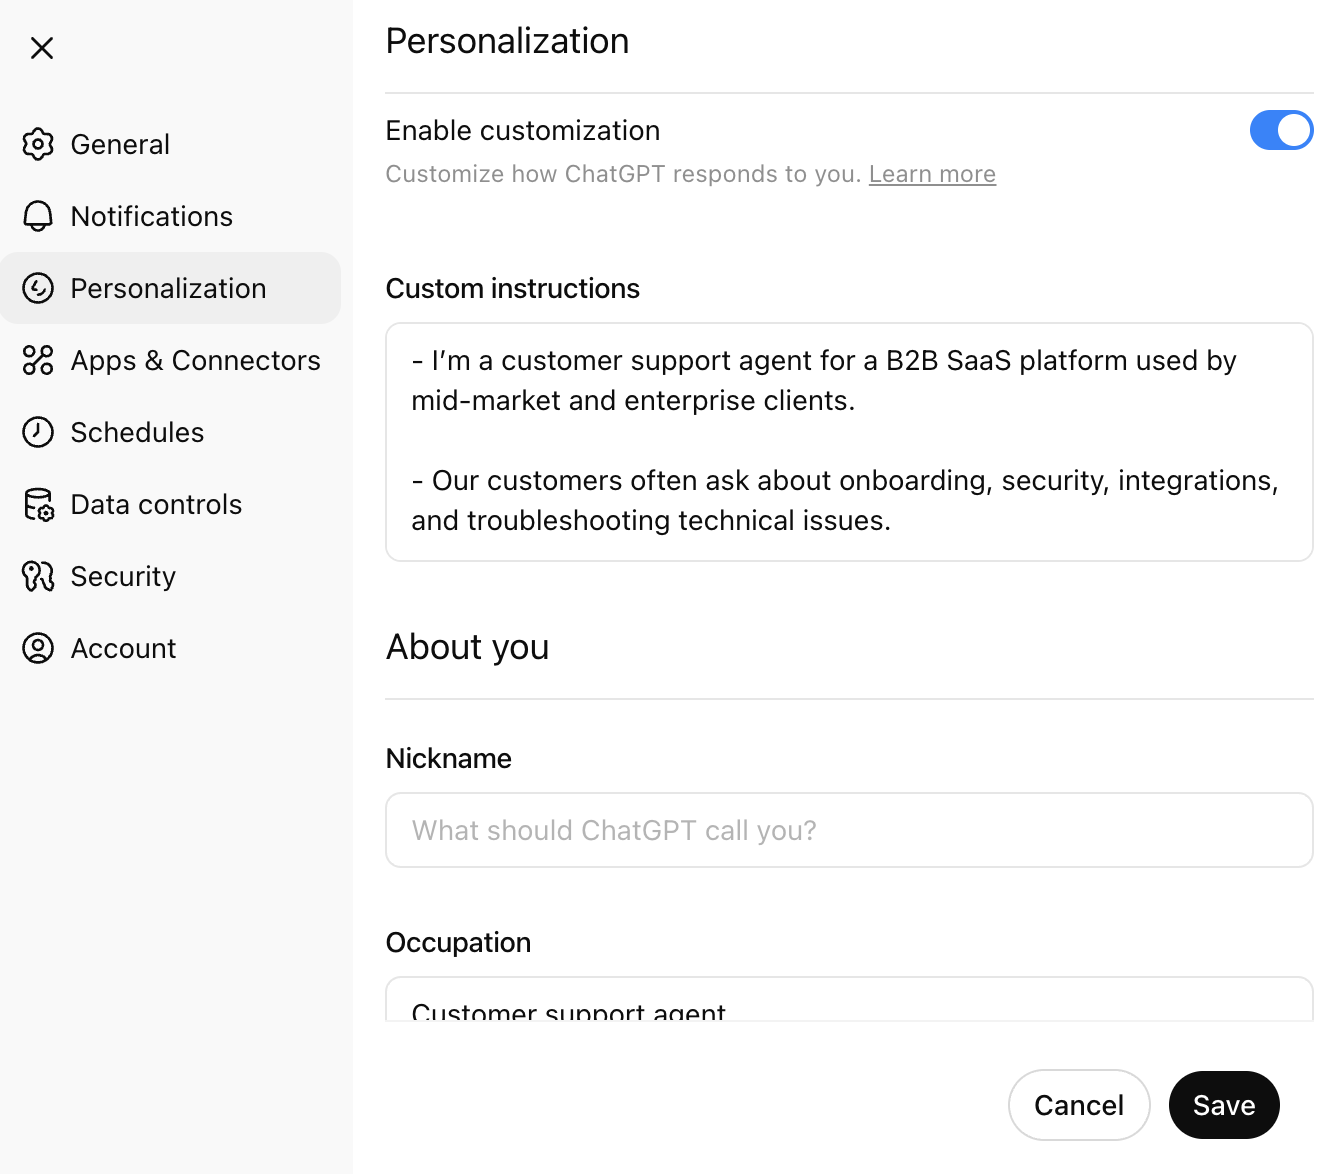
In the pop-up that appears, click the toggle next to Enable customization.
-
In the Custom instructions field, enter the directives you want ChatGPT to always consider when generating a response. For example, you can describe your role to give it more context and your writing style and tone so the responses sound like you. I also detail what not to do—like “Don’t use overly technical language” or “Don’t make assumptions about the customer’s setup.”
-
Optionally, you can edit these fields:
-
About you: This is where you can tell ChatGPT your occupation and more details about yourself.
-
Memory: You can enable/disable memories, which gives ChatGPT more context when generating its responses.
-
Advanced: By default, most of the features you’d want ChatGPT to have are enabled—like web search, code, and canvas. But you can pick and choose which ones you want to keep enabled.
-
-
Click Save.

If you’ve set up projects in ChatGPT, you can apply specific custom instructions to each one. This way, you can jump between projects and have ChatGPT simultaneously context switch with you.
How to build your own custom ChatGPT
Where custom instructions fall short—namely, that you can’t share them or extend their functionality much beyond your own workspace—OpenAI’s GPT builder picks up the slack. With it, you can create multiple custom chatbots that you can share with others. You can also upload knowledge files directly to your GPT, giving it persistent context without needing to paste the same resources into every conversation.
Here’s the short version of how to use the GPT builder. For detailed steps with more screenshots, check out how to create a custom GPT. Note: While users on a free plan can access GPTs, building a custom GPT is available only to users on a paid plan.
-
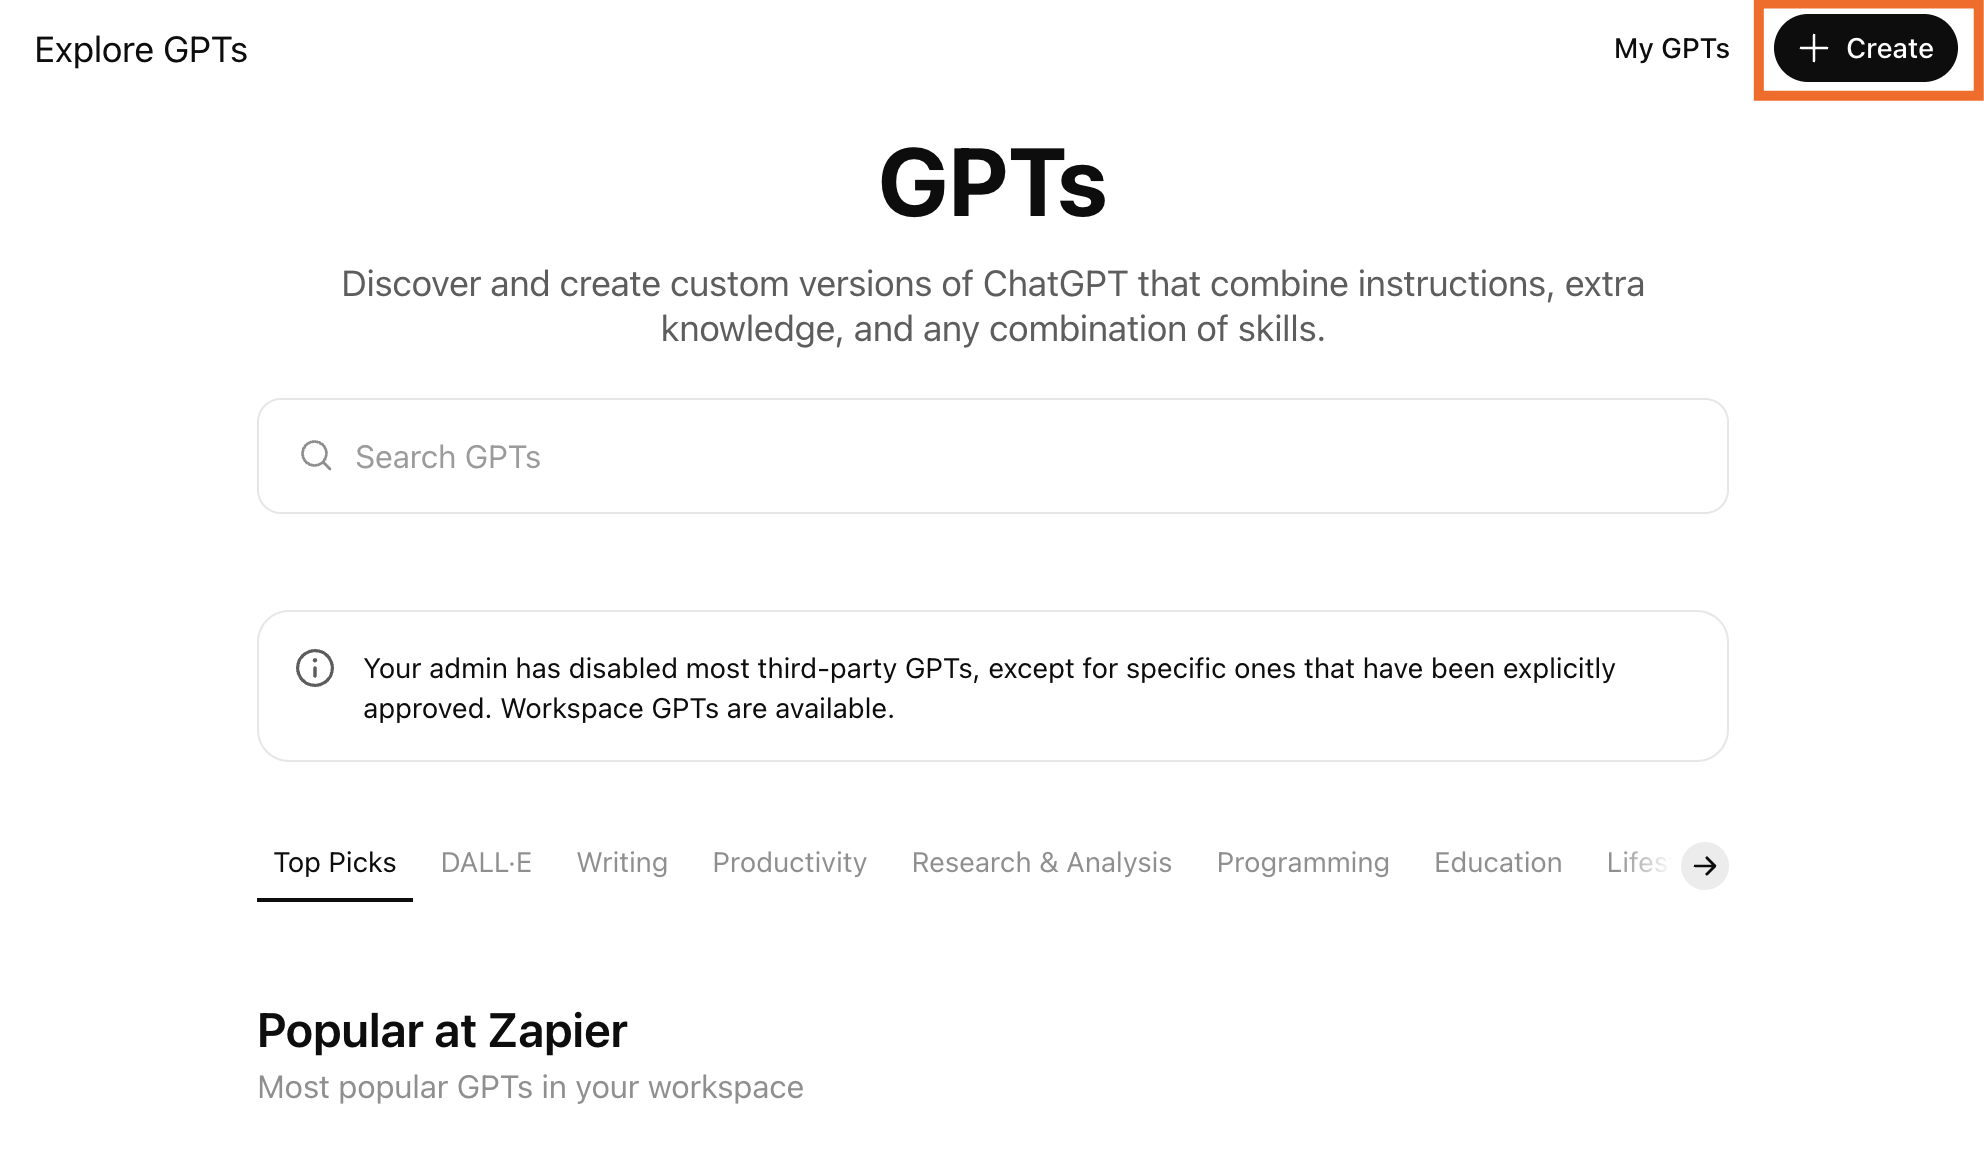
Go to chatgpt.com/gpts.
-
Click Create in the top-right corner.
-
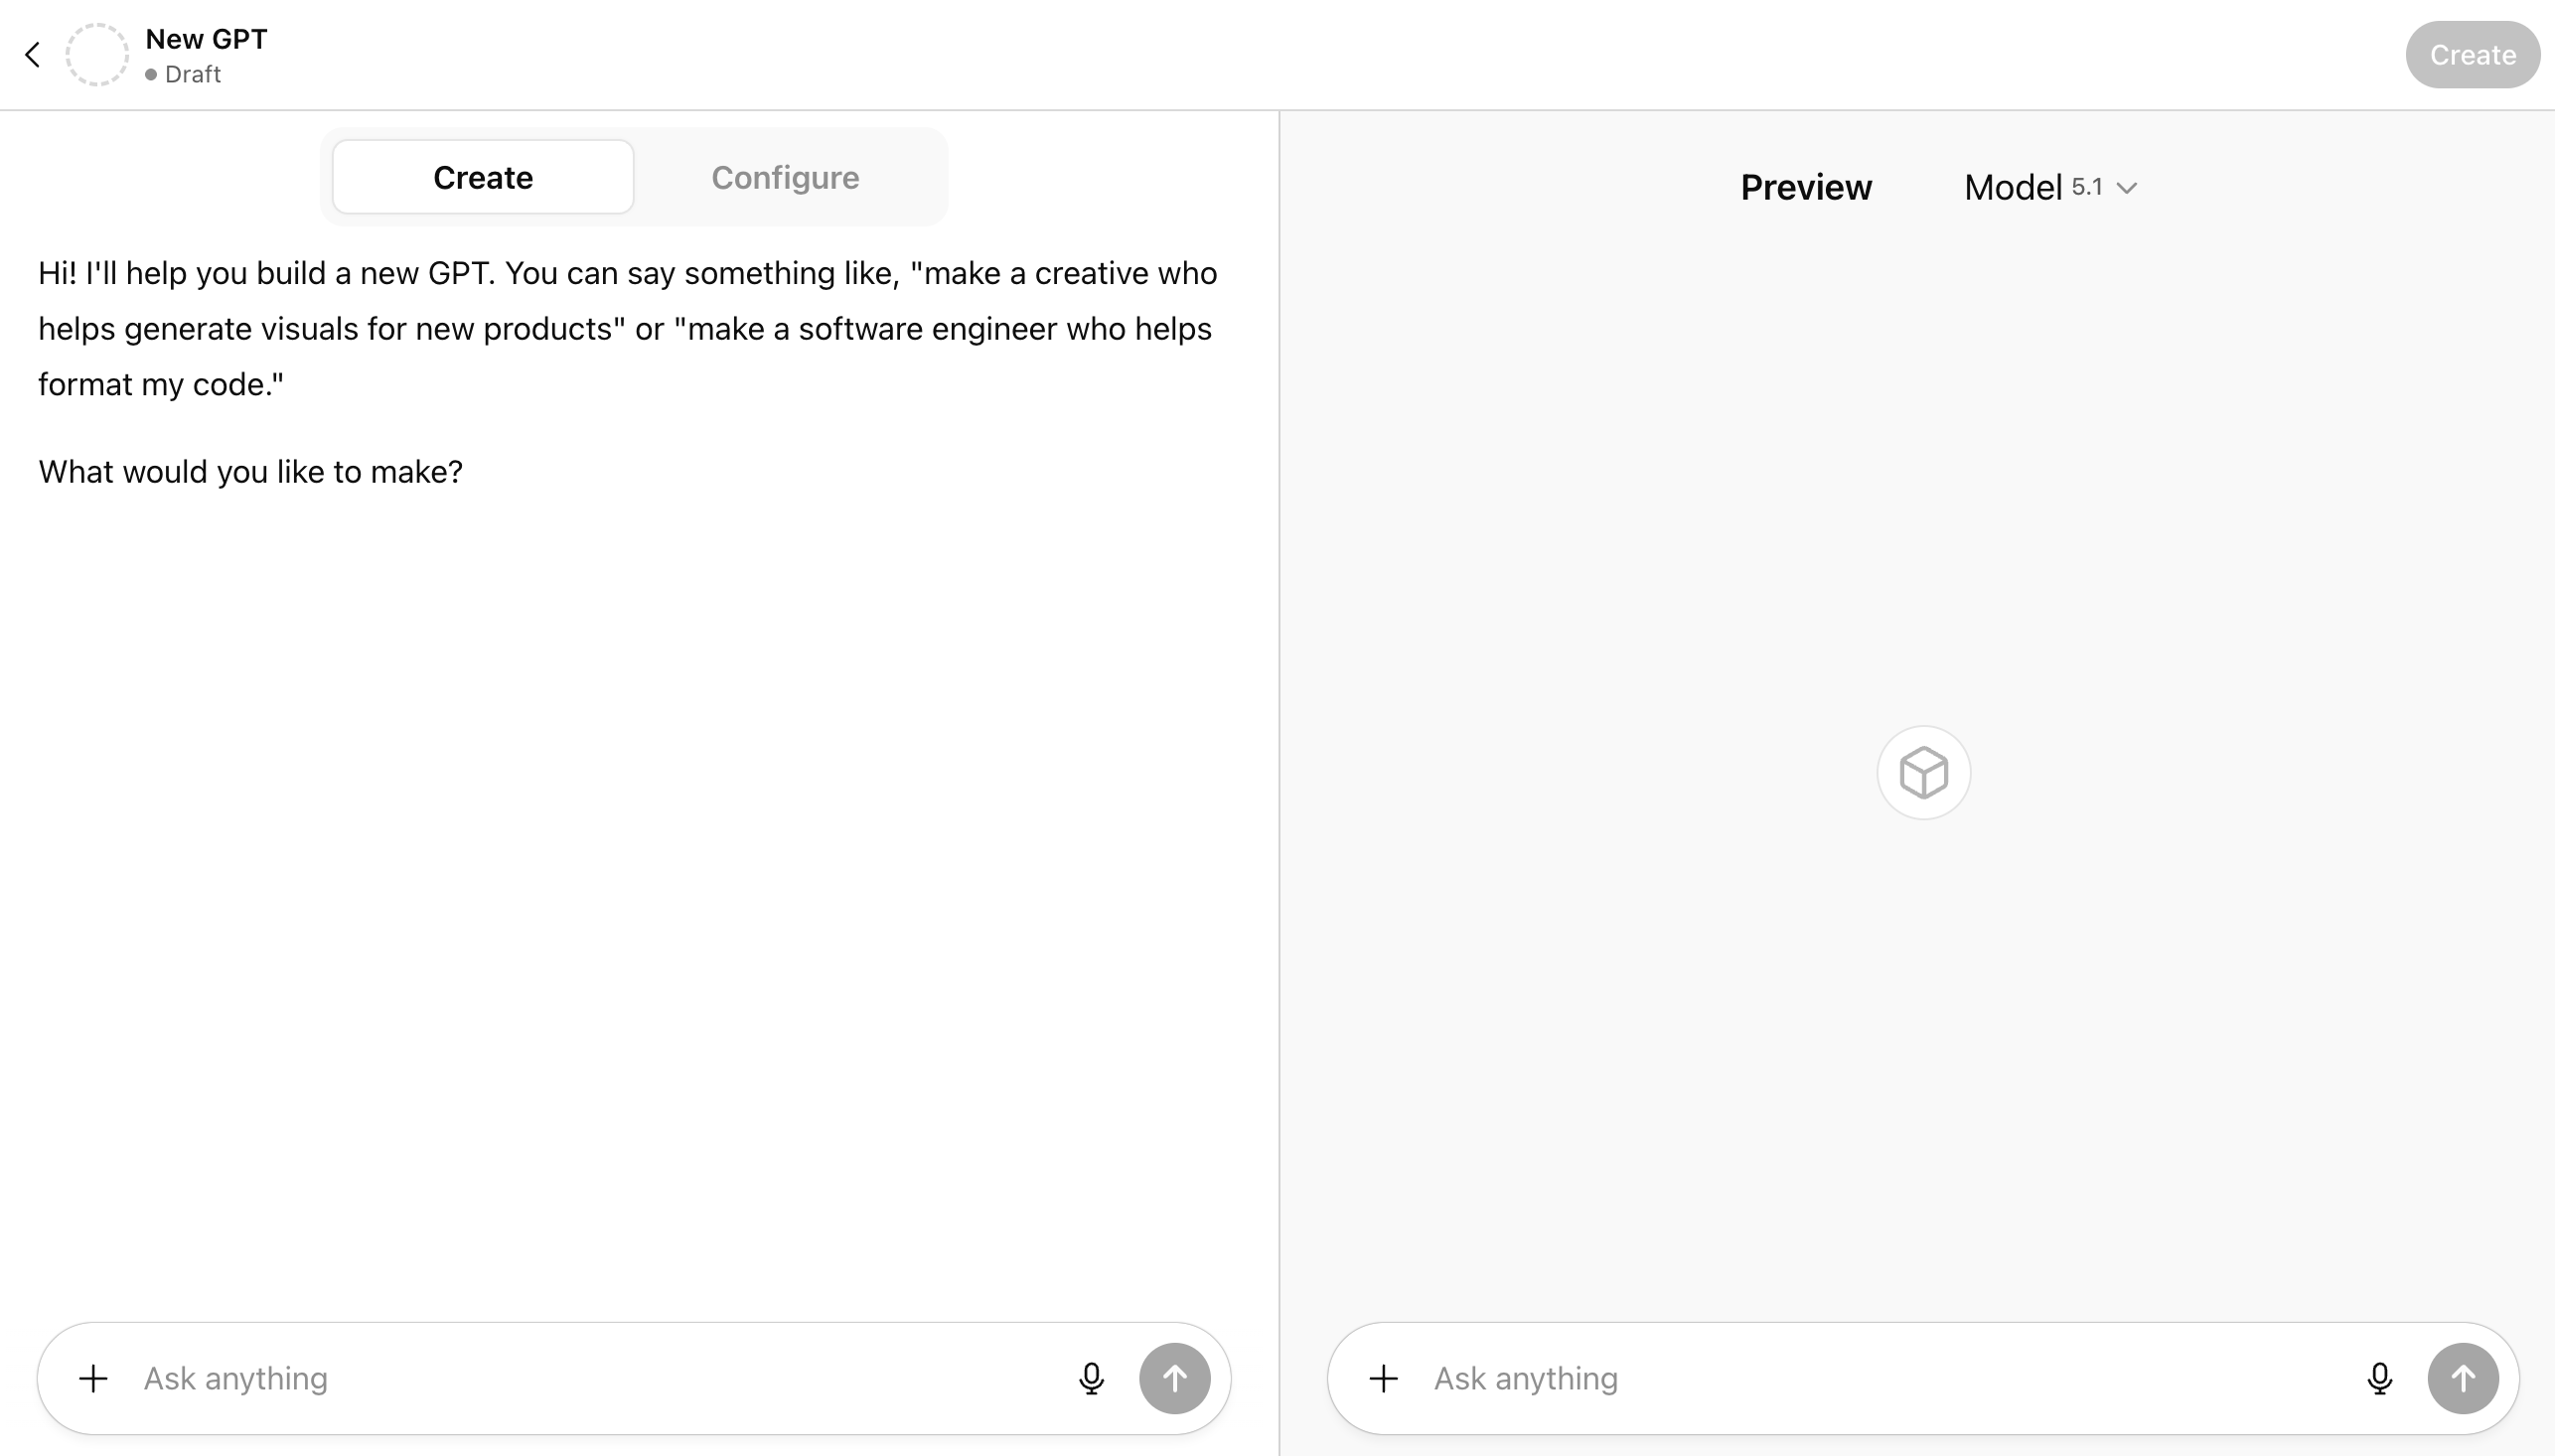
Enter your directives in the message box of the Create page. Chat with the GPT builder until you get the results you want.
-
Click Configure to add advanced customizations to your GPT. For example, you can change your chatbot’s name, further refine the instructions, upload knowledge files, and set up actions.
-
Click Create, and select how you want to share your custom GPT.
-
Click Update.


ChatGPT, along with any custom GPTs you build, will appear in the side panel of the ChatGPT home page. Click the GPT you want to use, and interact with it the way you normally would.

You can also build a custom chatbot and train it on your own data using the OpenAI API, but it requires extensive coding knowledge and is far more time-consuming than the ways listed in this article. If you have the coding skills, however, and you’re up for a challenge, the API is your oyster.
How to create your own chatbot with Zapier
If experimenting with ChatGPT’s custom instructions and GPT builder illustrate anything, it’s how handy AI-powered chatbots can be when it comes to certain tasks. The only problem is that if your chatbot doesn’t “talk” to the rest of your apps, you still have to manually connect the dots.
For example, you have to copy ChatGPT’s blog outline and paste it into Google Docs before you can flesh out the details. Or if you use the Data Analyst to analyze your quarterly financial statements, you have to first upload the CSV file to ChatGPT, wait for the analysis, and then share it with your team.
This may not be a big deal at first. But as your tech stack grows—and more teams across your org adopt AI—keeping everything connected becomes a real time suck. And without a scalable way for AI to access your systems, each new use case becomes another isolated chatbot rather than part of a cohesive workflow.
That’s where Zapier Chatbots and Zapier Agents come in. They allow you to pair AI with automation, so you can build better processes that automatically move information from one app to another—eliminating the time you spend hopping between tools. You can also create chatbot templates and share them with other teams, making it easy to deploy AI-powered processes company-wide.
Here’s how to use each tool:
How to use Zapier Chatbots
Zapier Chatbots offers the same level of ease when it comes to building your own custom, shareable chatbot. Scrape webpages (like your help center or website), upload documents, or connect it to Zapier Tables, so it has all the information about your business—perfect for building things like a customer support chatbot or appointment scheduling chatbot. Then customize the look and behavior of your bot, add logic to gather information, and fine-tune your directives.
Here’s the quick overview of how to create and share a Zapier chatbot. For detailed steps, check out our Zapier Chatbots guide.
-
Go to zapier.com, and log in or sign up for free.
-
Click Chatbots in the left-hand menu.
-
Click Create in the top-right corner of your screen.

-
Choose how you want to create your chatbot: from scratch or using AI.
-
Give your chatbot a name, and click Create. If you’re using AI, you’ll also be prompted to enter a unique URL.
-
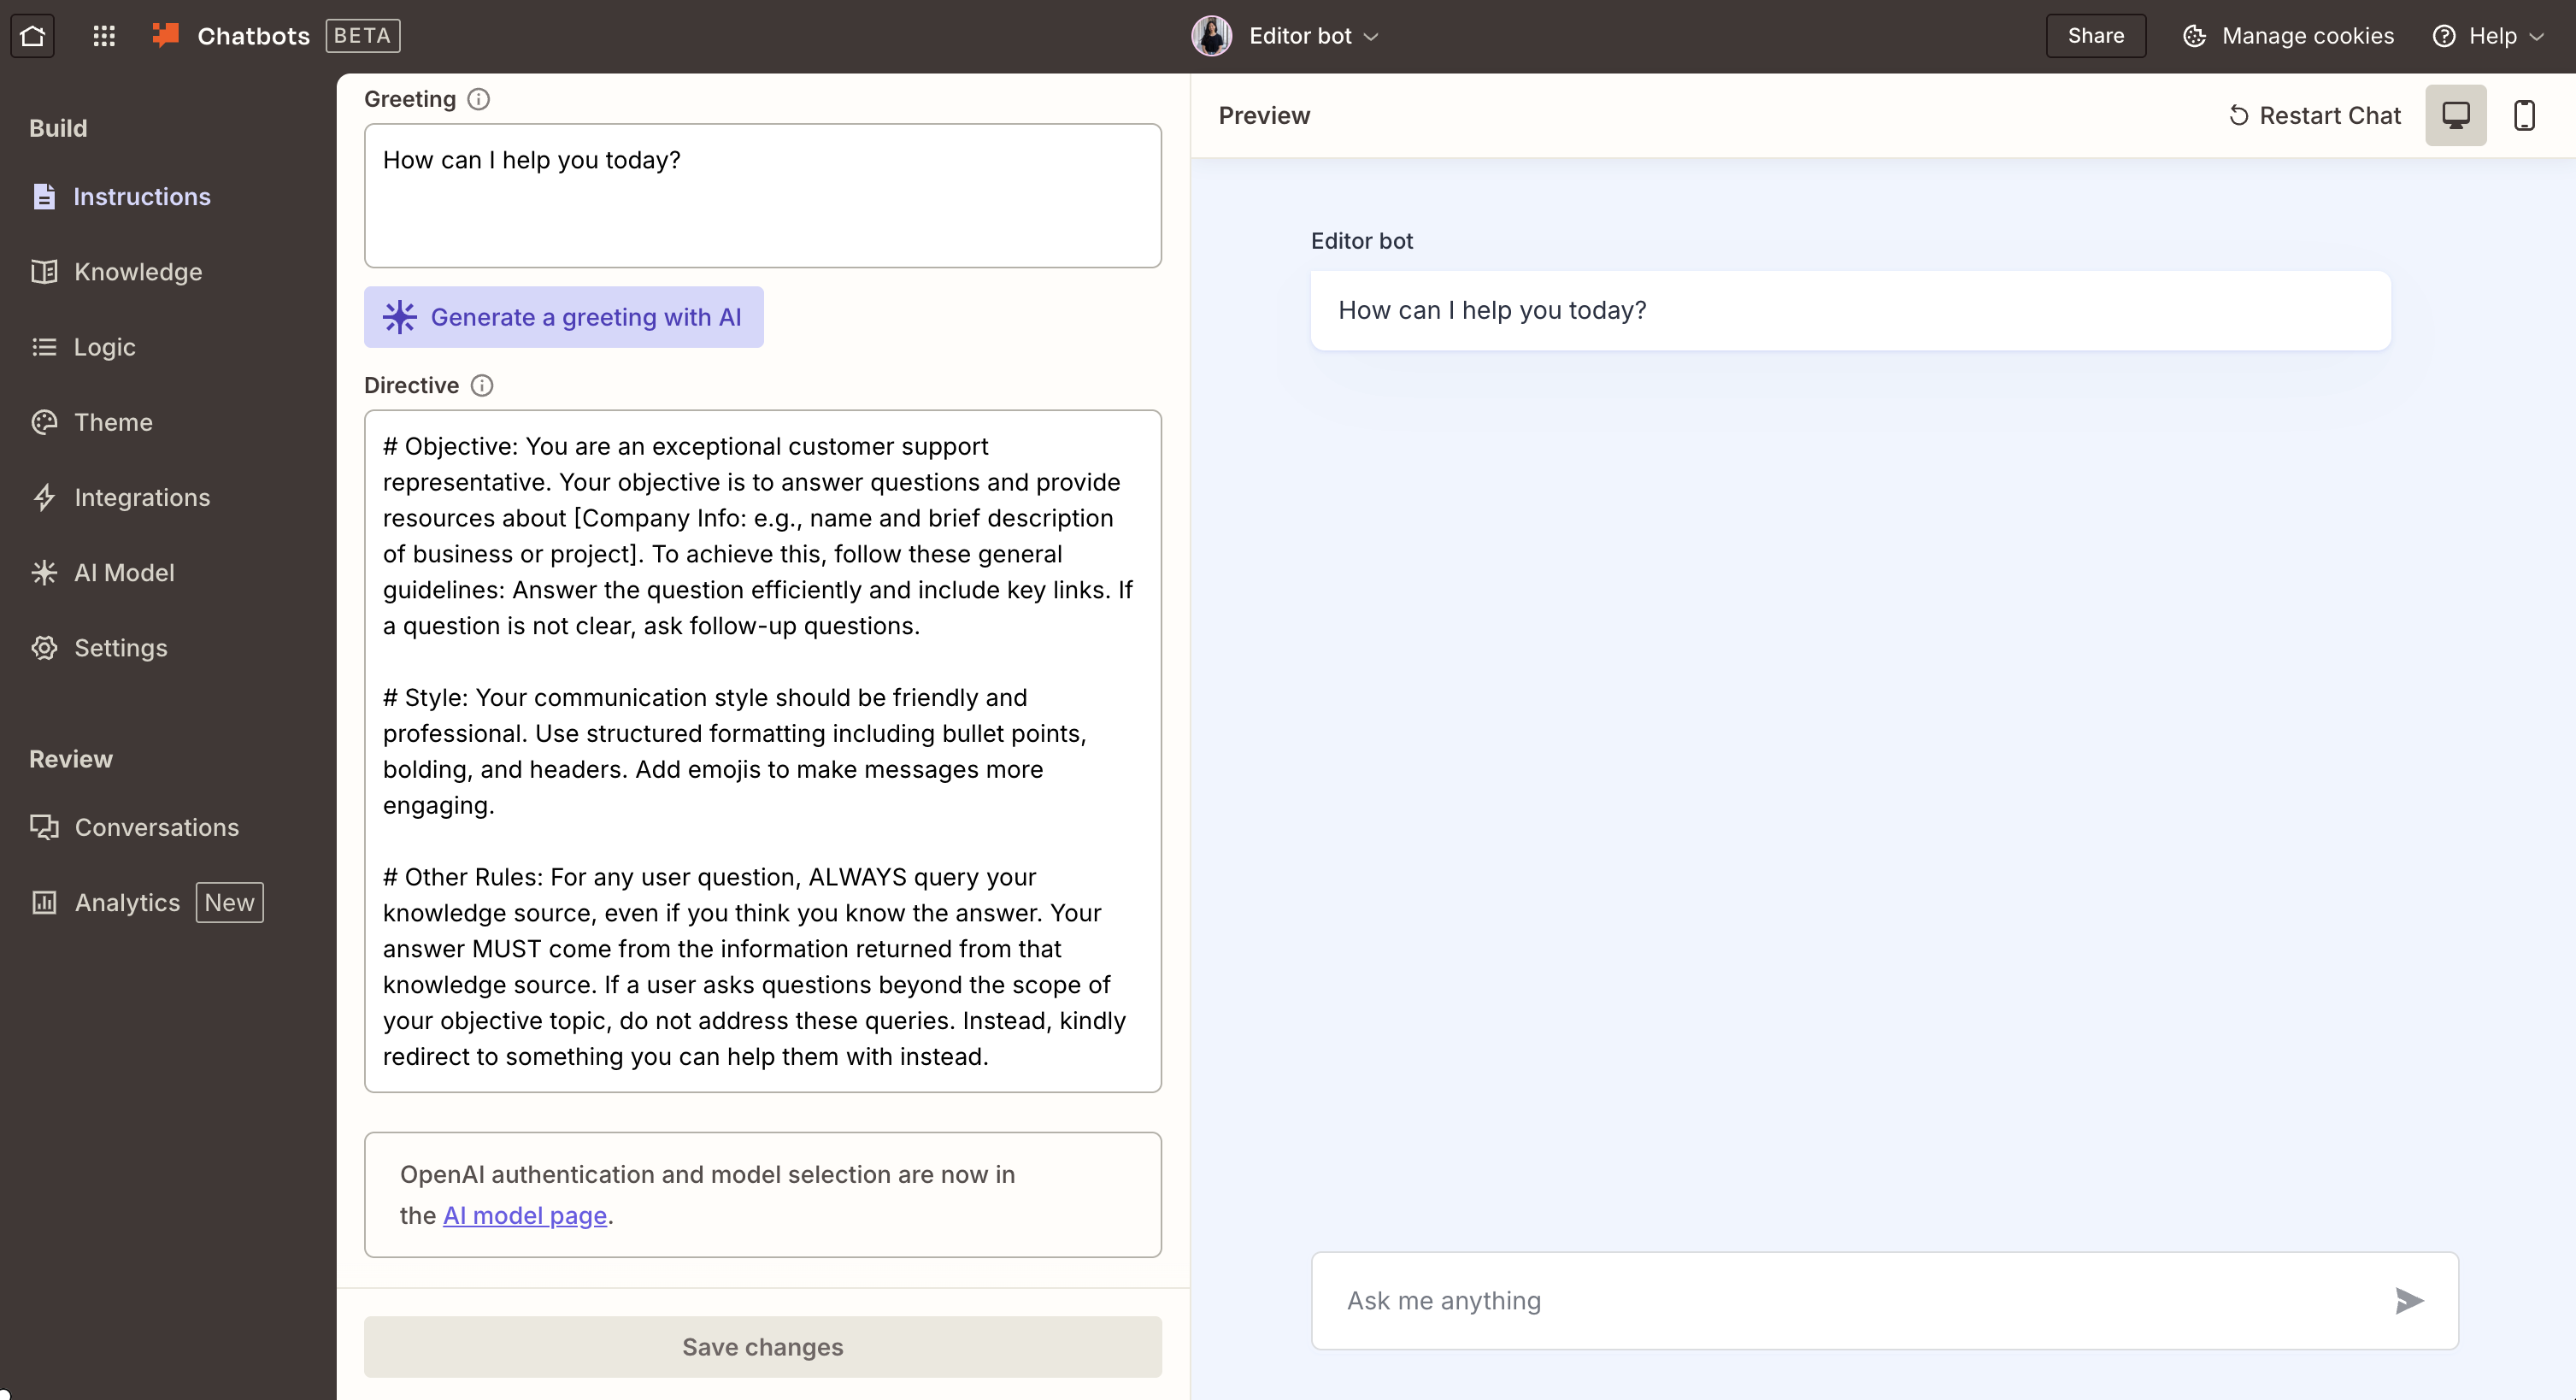
On the Instructions page, enter your chatbot’s greeting (this is what users will see every time they initiate a chat with your chatbot), and the directives. At any point, you can preview how your chatbot works on the Preview page of your chatbot builder.
-
The left-hand menu gives you more options for customization and functionality:
-
Knowledge. You can upload knowledge sources, like your organization’s brand guidelines or product messaging guide, to give your chatbot more context when generating its responses. You can also connect your chatbot to a Zapier Table to act as a source of truth or get it to crawl specific URLs to retrieve knowledge.
-
Logic. You can set up intelligent workflows that can be automatically triggered from specific actions in a chat—for example, once a chat with a prospect ends, you can automatically save lead data in Tables or your CRM.
-
Theme. You can customize your chatbot’s appearance by adding your company logo or changing details like the color theme.
-
Integrations. You can connect your chatbot with over 8,000 apps and AI tools, allowing you to orchestrate workflows across your entire tech stack. For example, as you save lead data in Tables, you can layer in AI to enrich and qualify lead data, and notify the right sales rep for a follow-up.
-
AI model. By default, Zapier Chatbots use an OpenAI model. But you can change the model by adding your own API key from your preferred model.
-
Settings. You can change additional settings, like the chatbot error message, browser title, and subdomain.
-
-
Click Save changes.
-
Once your chatbot’s ready to go live, click Share in the top-right corner. You can share it using a public link, as a website embed, or within a Zapier Form.


For more inspiration, check out Zapier’s library of chatbot templates, or click one of these pre-made templates to get started.
AI Chat for Customer Service Template
Resolve customer questions and reduce support volume with a customized chatbot.
AI Chat for Lead Generation Template
Increase lead engagement with a conversational chat experience embedded on your website.
Employee onboarding AI Chatbot Template
Empower your HR team with an OpenAI-powered chatbot for a seamless onboarding experience.
Zapier is the most connected AI orchestration platform—integrating with thousands of apps from partners like Google, Salesforce, and Microsoft. Use interfaces, data tables, and logic to build secure, automated, AI-powered systems for your business-critical workflows across your organization’s technology stack. Learn more.
How to use Zapier Agents

Much in the same way you can train Zapier Chatbots to support your customers, you can use Zapier Agents to train AI agents to automatically handle the rest of your tasks—all from one unified workspace.
Start by giving your agent access to your company’s source of truth in apps, like HubSpot, Notion, and Airtable. Then you can train your agents to automatically work with that data even while you’re not there: tell your agent what to do when it’s triggered, how to process or summarize data, and which actions it should take, all without writing a line of code. You could create a sales outreach agent, a viral content creation agent, or a customer sentiment analysis agent
Here’s the short version of how to use Zapier Agents. For detailed steps and more examples of what you can do with Agents, check out our Zapier Agents guide.
-
Go to zapier.com, and log in or sign up for free.
-
Click Agents in the left-hand menu.
-
Click New agent in the top-right corner of your screen.
-
Choose how you want to build your agent:
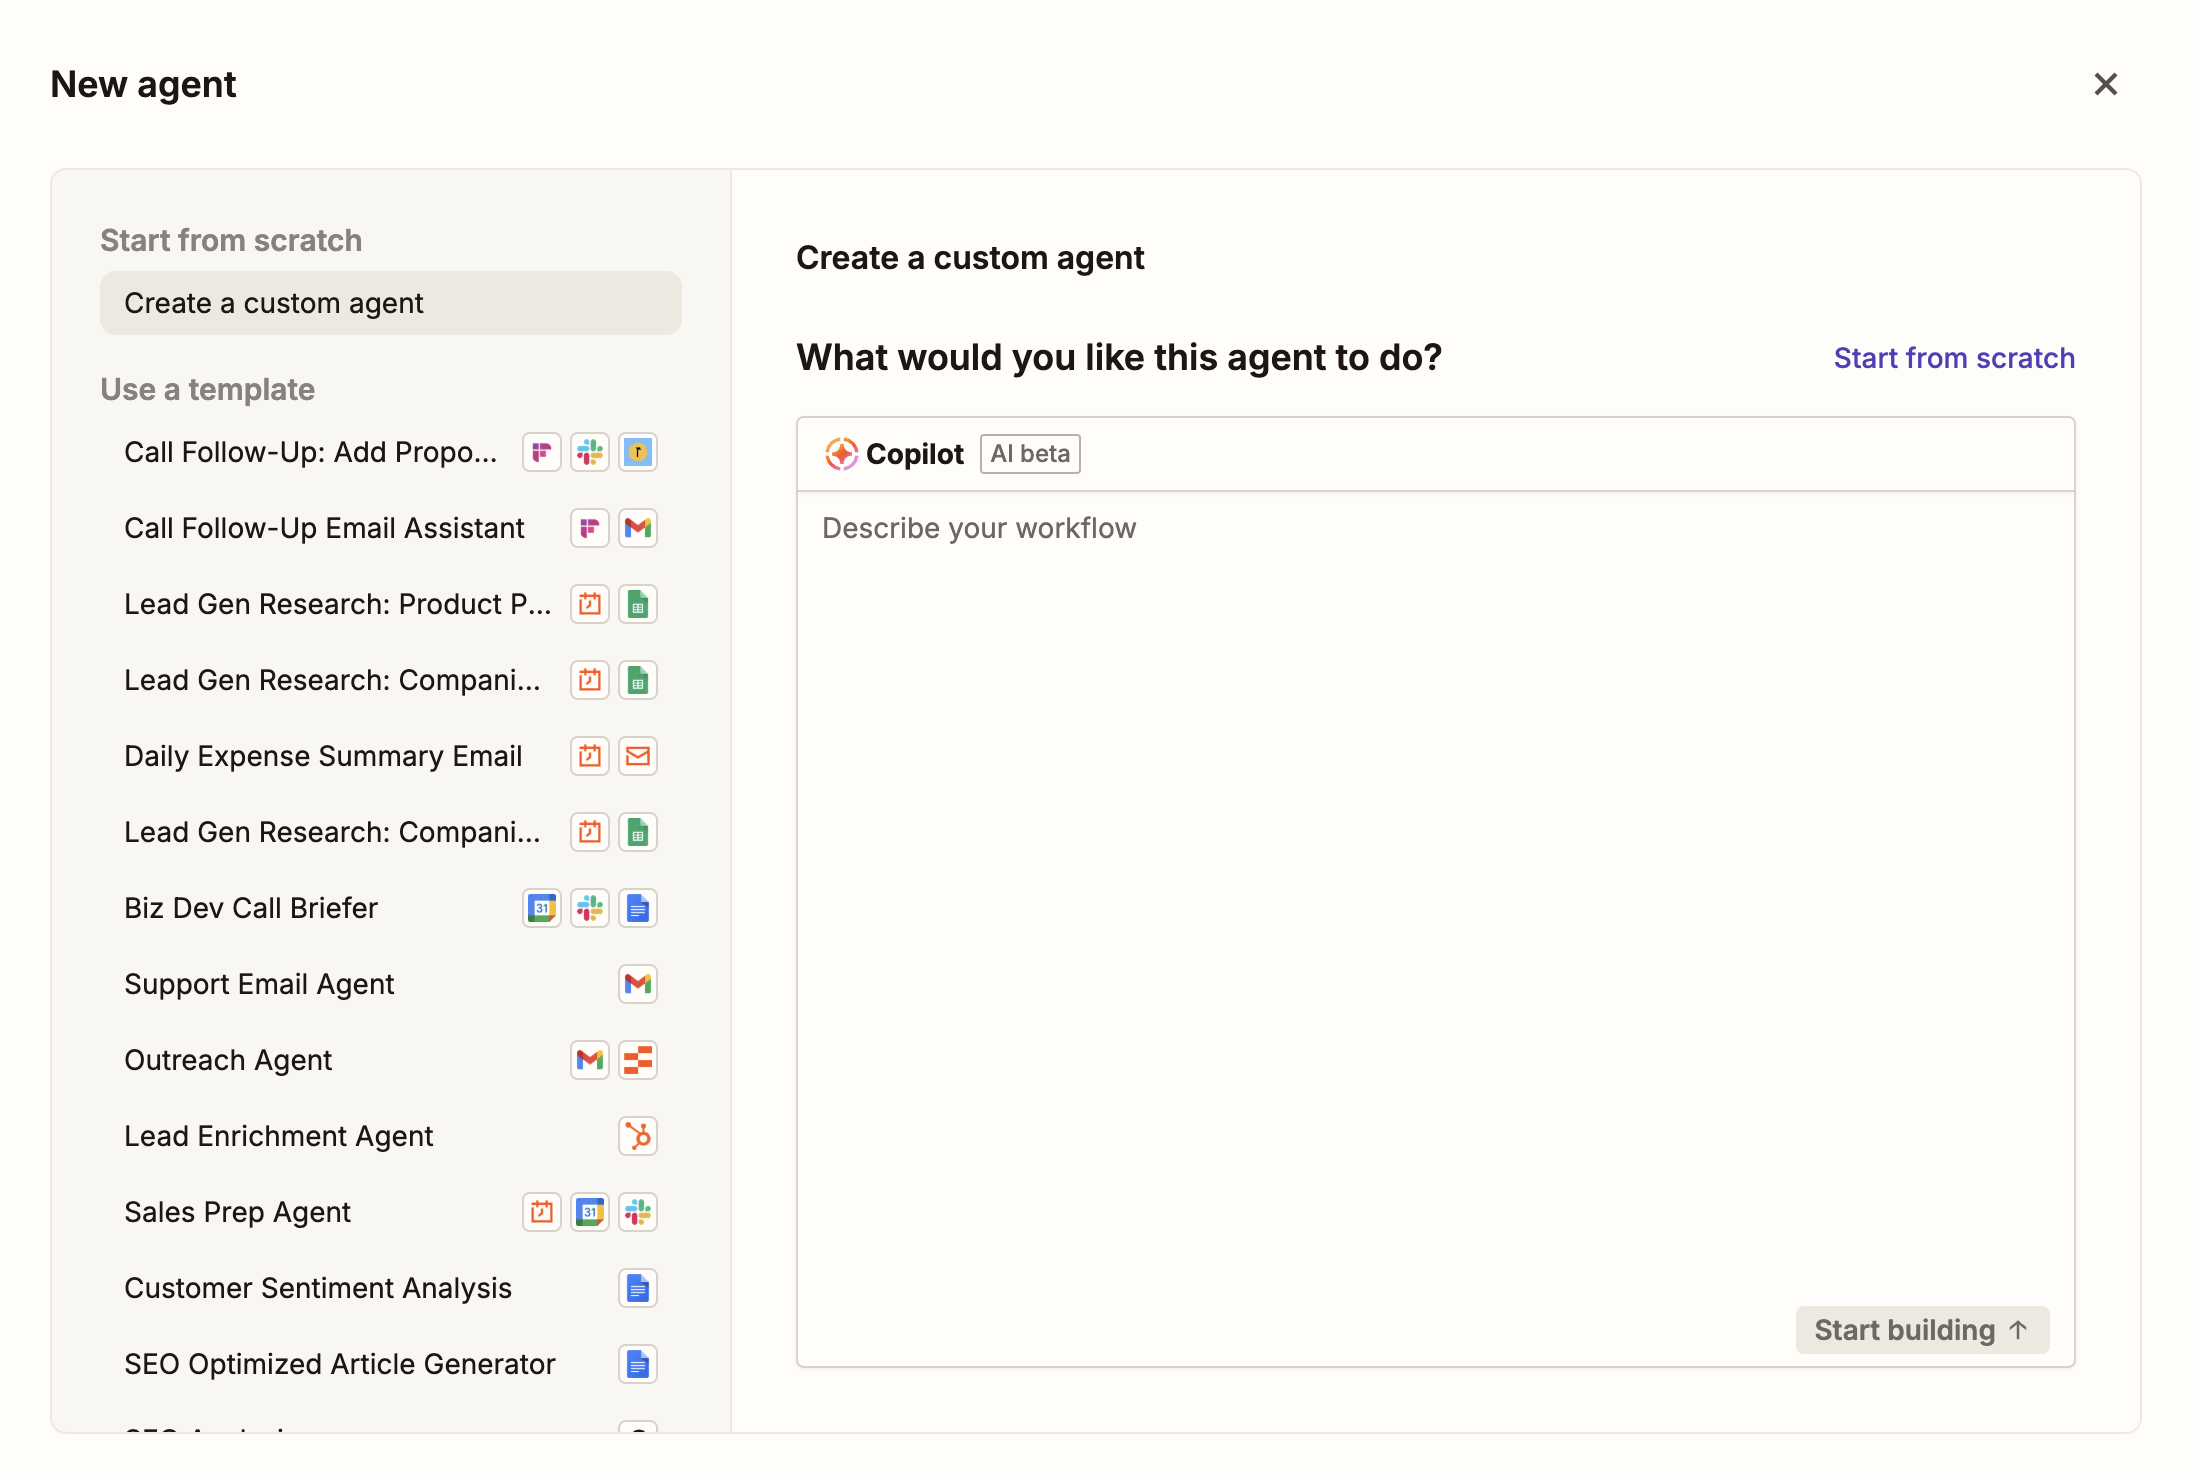
-
From scratch with Zapier Copilot. Describe what you want your agent to do using natural language, and Copilot (Zapier’s AI assistant) will design a solution for you and build it.
-
Using a template. Click any of the templates in the left-hand menu of the pop-up to jumpstart your build.
-
-
Click Start building (if starting from scratch) or Use this template (if using a template).
-
On the Configure view of your agent builder, you can continue to refine your agent by telling Copilot what to do (left-hand side of the builder) or by manually editing your agent (right-hand side).

-
At any point, click Agent Preview at the bottom of the builder to preview how your agent is working.
-
Once your agent’s ready, click Share in the top-right corner to share it with the rest of your team. You can also click Generate template link to turn it into an agent template that others can iterate on.


For more inspiration, check out Zapier’s library of agent templates, or click one of these pre-made templates to get started.
Experiment and tweak as you go
If you’re just beginning to wade into the AI waters, the outputs from your custom chatbots and assistants may not hit the mark right from the start. And that’s ok. You and your bot are both learning—that’s the whole point of training it.
Refine your prompts and upload additional resources, if necessary.
Related reading:
This article was originally published in May 2024. The most recent update was in December 2025.

-Dec-04-2025-05-17-34-7864-PM.webp "How to target ready buyers")


